Recipe: Low FODMAP Crustless Quiche

10 Sep

20130910_104451_Sophia

I’ve been experimenting a little with the Low FODMAP diet. For those who don’t know what “Low FODMAP” is, I suggest taking a look at the information on the Monash University Low FODMAP Diet page. In brief, FODMAPs are carbohydrates (including fructose and lactose, among others) that are malabsorbed by people who suffer from Irritable Bowel Syndrome, causing the symptoms that IBS sufferers get. A Low FODMAP diet is often used for an elimination diet trial for those with IBS to find what an individual may or may not be able to tolerate. Tolerance to different foods can vary greatly – some may be able to tolerate lactose while others may not, for example.

At this point I’m simply experimenting with some recipes in preparation to do the Low FODMAP elimination diet. Being a lover of food, I’m not a big fan of the idea of having to cut out so many different things! But I’m slowly warming to the idea knowing that I’ll be healthier because of it and may not have to be so restrictive long-term if I find I can tolerate certain things! For now, I’m drinking lactose-free milk, finding ways to add flavour to savoury dishes without onion or garlic, cutting out high-fructose fruits, and trying to cut wheat flour out of recipes in favour of Low FODMAP alternatives such as quinoa flour (used in this dish), almond meal, or spelt flour. Its challenging to say the least!

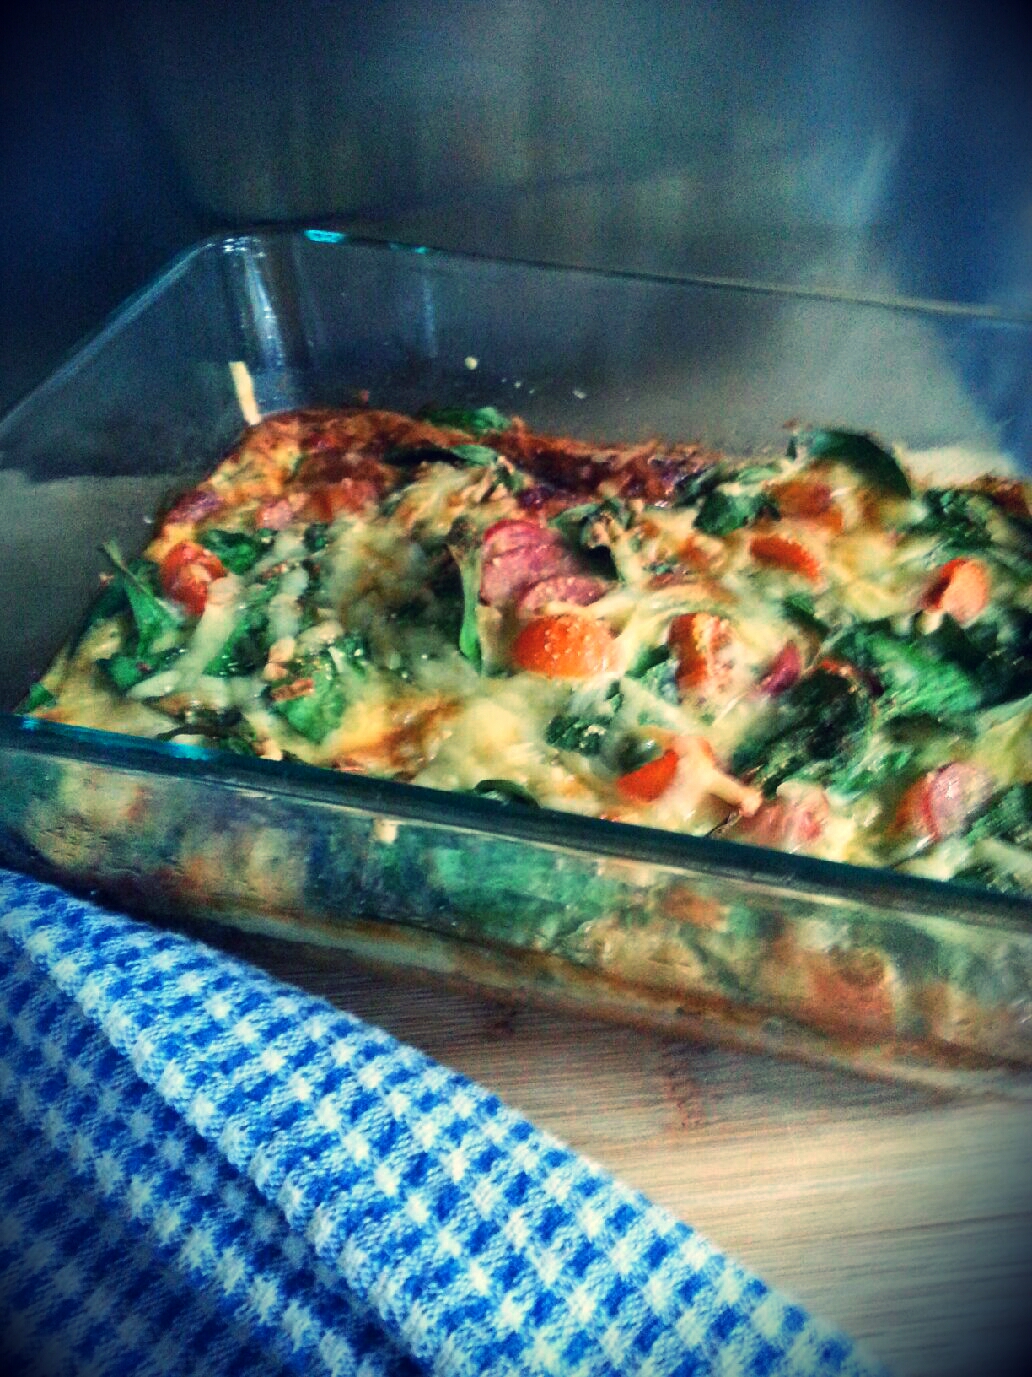
This recipe is based on my classic crustless quiche I’ve made for years. Basically, you can add any filling to it that you like! I seem to vary what I use every time I make it. Previously I’ve made more the traditional “quiche lorraine” style, or have added mushrooms, different types of cheeses, you name it! It really is as versatile as your imagination. This time I opted for fresh spinach, cherry tomatoes, kabana sausage (I’d usually use bacon but didn’t have any on hand), and a small amount of cheese (the original recipe calls for 1 cup of grated cheese, I use about half that quite happily). I used some herbs to help with the flavour, and subbed quinnoa flour that I’d milled myself instead of the usual plain flour. It had a touch of the bitterness you can get with using quinnoa flour, but it balanced well with the other flavours in the dish and my other-half didn’t even comment that it tasted different to how I’ve made it previously. Success!

LOW FODMAP CRUSTLESS QUICHE:

nutritional quiche 3 eggs
1/2 cup quinnoa flour
1 tsp baking powder
1 1/2 cups lactose-free light milk
1 piece kabana sausage (or bacon, etc.), sliced or diced & lightly cooked
Mixed herbs, to taste (chives are good in place of onion or garlic)
1 cup (roughly) fresh baby spinach leaves
4 cherry tomatoes, quartered
1/2 cup light grated cheese

Preheat the oven to 180 degrees C. Grease an oven-proof dish.

In a mixing bowl, add the eggs, flour, baking powder, milk and herbs and beat until well combined.

In the oven proof dish, layer the kababa, spinach, and tomatoes. Pour over the egg mixture. Sprinkle with the grated cheese.

Bake in the oven for roughly 40 minutes, or until set and starting to brown on top. Serve with a side of salad or on its own as a light meal.

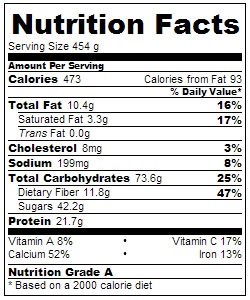
Nutritional information from Calorie Count, based on 6 servings.

Recipe: Chocolate Chip Cookie Mug Pudding

3 Sep

20130903_213920_Josh_Crt

Last night my other-half asked me “What’s for dessert?”. After a late finish at work, I can’t say I felt much like cooking! Dinner had been re-heated left-overs. Not minding the idea of something sweet myself but only wanting something incredibly quick and easy I could make with ingredients on hand, I opted to try my hand at inventing a mug cake.

I’m not going to pretend this is healthy. Its not even close to being healthy by my definition! So this is definitely one for moderation – a girly night-in snack, or for those PMS cravings when you don’t really care about the calories… One of these days I do intend to come up with a much healthier version – after all, I’m on a mission to come up with guilt-free tasty recipes! But for now, I present you the full-fat, full-sugar version in all its glory.

This mug cake has a hint of cinnamon and vanilla, and the bottom stays a little soft after cooking (partly due to the chocolate chips sinking a bit) – this forms a molten “sauce” which compliments the spongy pudding. The flavours are true to those of a chocolate chip cookie, hence the name for this dessert. And trust me – it goes great with some vanilla ice cream on the side!

CHOCOLATE CHIP COOKIE MUG PUDDING:

nutritional info mugcake

1 tbsp margarine
1 tbsp brown sugar
1 egg
1 tbsp extra-light sour cream
Few drops vanilla essence
Sprinkle of cinnamon, to taste
1/4 cup self-raising flour
2 tbsp chocolate chips

Heat the margarine in a microwave  for 30 seconds, until melted. (My microwave is 1000W, cooking times may vary.)

Add the brown sugar to the melted butter and mix well. Beat in the egg. Add the sour cream and mix well until an even consistency is reached. Add the vanilla and cinnamon, to taste – remember that a lot can go a long way in a small dessert!

Add the flour to the moist ingredients and stir through, until you get an even cake batter consistency. Mix through the chocolate chips and mix in until only just combined.

Cook in the microwave for around 1 minute. The top should feel very springy when touched. Turn out into a bowl and serve with ice cream.

Nutritional information from Calorie Count.

Recipe Index

3 Sep

Here’s where you’ll find an archive of all the recipes I’ve posted. I’ll update this page as new recipes are added, so feel free to bookmark it for future reference. All recipes show the nutritional information in the post.

Sweet treats:

Smoothies:

Main course:

Recipe: Cranberry Chia Bliss Balls

31 Aug

IMG_20130831_155705

I have to admit, I have a weakness for snacking when I’m bored. During down-time at work I find it all to easy to turn to that half block of chocolate hiding in the cupboard, or that bag of potato chips being shared around. I’ve found that the more health-conscious I’ve become, the less I enjoy those processed foods high in sugar, salt, and goodness knows what else.

I decided to trial making my own bliss balls that I could have on hand for snacking or before exercise. I came up with this recipe based on what is in my cupboard, and might have been a little heavy handed with the flaxseed meal. But I think they turned out OK! They aren’t overly sweet, and even with the small amount of cocoa powder they aren’t particularly “chocolatey”. I can’t wait to try my hand at another batch using different flavours, and would consider adding some protein powder in future to make an after-exercise treat.

This recipe made 8 bliss balls, and is very low in sodium, high in dietary fibre, contains no cholesterol, and is also high in manganese and magnesium. While I’m not well versed in raw and clean eating, I believe you wouldn’t have to make too many changes to these to satisfy the requirements for either – substitute cacao powder and a vanilla bean instead of the cocoa powder and vanilla essence. Feel free to correct me if I’m wrong in that assumption!

CRANBERRY CHIA BLISS BALLS:

cranberry chia balls nutritional info4 dried dates, soaked for at least 30 minutes in enough water just to cover (about 2 tbsp)
1/2 cup almond meal
1/4 cup flaxseed meal
1 tbsp cocoa powder
Vanilla essence (or scrape a vanilla bean), to taste
Ground cinnamon, to taste
3 tbsp dried cranberries
Chia seeds, for covering

Process the soaked dates and remaining water in a food processor. Add the almond meal and flaxseed meal, processing until a sticky dough forms.

Add the cocoa powder, vanilla essence and cinnamon and mix until combined (can knead, use an electric mixer, or food processor). Knead or mix through the dried cranberries.

Shape into 8 balls, and roll in the chia seeds to cover.

Nutritional information from Calorie Count.

Making the right changes

14 Aug

dontexpect

When I started out on my journey to get healthy, I was the same as everyone else. For years I’d found it easier to keep making excuses than making a change in my life. I’d always been blessed to be a “skinny person” in spite of a fairly sedentary lifestyle for most of my teens and early 20’s. For years I thought I’d taken the “healthier” option of purchasing low-fat or light options of milks, margarine, and cheese, and thought that pre-packaged soups and frozen meals were as nutritional as the “real thing”. I looked at my figure and gathered I couldn’t be making too many “bad” mistakes with my life if I was still slim.

After a number of events in my life, I knew it was time to make the change to be healthy late last year. No more excuses this time. No more joining a gym to only go once in a blue moon, or hiding behind ignorance of what really goes into pre-packaged foods, or trying to do too much too soon. This was it.

My advice to anyone standing at that fork in the road at present is to make it easy on yourself. Yes – EASY. But please don’t mistake what I’m saying here – making a huge lifestyle change is a big deal, it will be a struggle, but one you will thank yourself for. What I mean is that you have to make the changes early on that you know you can stick to. Don’t bite off more than you can chew.

I think a lot of people who don’t succeed in their attempts to “get healthy” try to conquer the world on their first attempt. Don’t try to go from couch potato to running 10km! You’ll hate it and probably injure yourself in the process! If you’ve got a weakness for a bowl of ice cream before bed every night, don’t try to go cold turkey on day one.

Here’s some of the little changes I started out with:

  • Find a form of exercise you enjoy: In my case, this was running. A few years ago I tried doing cardio and weights at the gym and hated it, and working out in front of a room full of strangers (ie. taking a class) seemed like my own personal nightmare! I found it impossible to form a habit of going to the gym because I hated being there. However, when I started out running I really liked it. I found freedom in hitting a track near a local creek – it gave me some “me” time to clear my head and enjoy being outdoors.
  • Don’t overdo it: Like I mentioned above, if you go from doing no exercise regularly to attempting to run 10kms you’re going to struggle, or hurt yourself. For me, a nice way to try to achieve this balance was to use the RunDouble Android app on my phone. It helped me to pace myself. If you’re more of a gym type, chat with a trainer to find a work-out plan that will be right for you. If you like group classes, make sure you start out in something that is aimed at beginners. There’s no shame in being new to fitness, particularly if you’re determined to make a change!
  • Don’t subscribe to the “fad” diets straight off the bat: By “fad diets” I mean the ones that involve a radical change. Perhaps one of these diets might suit you, but chances are if you attempt to go from your regular dietary habits to strictly “paleo” or “clean eating” (for example) you’ll find it a little too tough. I’ve seen far too many people I know cut something – or many things – completely out of what they eat in the name of improving their diet, only to then crave and binge on these foods. This is why, personally, I’ve taken the “everything in moderation” approach for my own healthy eating. I still eat cake, I still have dessert, I still drink milk and eat meat. I just am more sensible about which options I choose, the portion sizes, and how often I eat some of these things. I’ve found it much easier to still enjoy the things I love – I don’t feel like diet is a “punishment”, and I’m actually enjoying my healthier foods (like spinach!) more than I ever thought possible. Ease into the changes, don’t expect them on Day One.
  • Make being healthy a habit: They say it takes 21 days to form a new habit, and even longer to break old ones. Try to find time every day to exercise if possible. For me, its not possible to run every day. I set aside 3-4 mornings a week where I have a good run, and on other days I try to make a conscious effort to move as much as possible – take the stairs, stand and walk around rather than sit at a desk all day. Since I got into this habit, it now feels strange not running on the days I usually would!

Recipe: Lemon Blueberry Bundt Cake

13 Aug

Lemon Blueberry Bundt Cake

I adore bundt cakes. There’s something beautifully simplistic about them. I’m not into fancy decoration and piping bags, and I don’t like buttercream icing, so bundt cakes suit me as a home-baker. You have all the visual appeal you need from the style of pan – simply sprinkle with icing sugar or a glaze and you have something you can be proud to share.

This lemon blueberry bundt cake is no different. I made a few alterations in an attempt to make it slightly healthier from the original recipe – Blueberry Lemon Buttermilk Bundt Cake by the Brown Eyed Baker. I wasn’t 100% pleased with the texture – I thought it was a little too dense and believe it was my alterations that caused this – but my work colleagues devoured it and kept begging for more! Granted, they are an easy crowd to please! The flavour of this cake really was a hit – the lemon is only subtle but perfectly complimented the blueberries. I also added a lemon cream cheese glaze made from icing sugar, light cream cheese, lemon juice, and thinned with a little skim milk. I can’t remember the proportions as I made it up on the fly, but I’m sure anyone savvy in the kitchen could come up with something similar.

LEMON BLUEBERRY BUNDT CAKE:

nutritional information

2 1/2 cups flour
2 tsp baking powder
1 cup raw sugar
Zest of 1 lemon
1 cup light olive oil spread
3 eggs
1/2 tsp vanilla extract
1/4 cup low-fat natural yoghurt
1/2 cup skim milk
2 cups blueberries, tossed in flour

Preheat oven to 180C. Butter and flour a standard bundt pan.

Sift the flour and baking powder. Set aside. Combine the milk and yoghurt. Set aside.

Add the sugar and lemon zest to a mixing bowl and mix until combined – the sugar will be slightly moist from the lemon zest. Add the olive oil spread and cream until light and fluffy.

Add the eggs, one at a time, on a low speed. Add the vanilla. Add the flour and milk/yoghurt mixture in parts, alternating between the two.

Gently fold through the blueberries after first tossing in flour – don’t overmix. Immediately pour into your prepared bundt tin and bake for around 55-60 minutes, or until a skewer comes out clean when tested. Allow to cool before turning out of the pan.

Serve with a glaze of your choosing (the original recipe has a simple lemon glaze, or try your own version of the cream cheese glaze I did) or simply sprinkle with icing sugar.

(Nutritional information from Calorie Count)

Recipe: Banana Oatmeal Smoothie

7 Aug

20130807_135653_Hagrid_Cream

Smoothies are great “on the go” meals where you’re only limited by your creativity. Personally I prefer the sweet, fruit-based dairy smoothies, and opt for natural low-fat yoghurt as my protein source rather than protein powders.

This banana oatmeal smoothie is great for a post-workout meal or breakfast on the go. Yes, its down-side is the higher sugar content… but keep in mind the sugars are all natural, nothing refined. Its a great source of fibre and calcium, and keeps you feeling full and satisfied.

BANANA OATMEAL SMOOTHIE  RECIPE:

banana oatmeal smoothie facts

1 banana, peeled & cut into pieces
2 tbsp flaxseed meal
1/3 cup rolled oats
1/2 tbsp honey
120g (roughly 1/2 cup) low-fat natural yoghurt
2/3 cup low-fat skim milk
cinnamon to taste

Blend together all ingredients until well combined.

(Nutritional information from Calorie Count)

App review: RunDouble

7 Aug

RunDouble App

“RunDouble” is probably the sole reason I stuck with running when I started out. Let me introduce my pre-running self: I was a busy full-time professional who found it easy to make excuses to avoid fitness. If it wasn’t lack of time, it was that I had no where to run, or that I’d find it boring. Excuses, excuses, excuses…

I’d heard about the “C25K” (couch-to-5-k) programs previously. They sounded straight forward enough and I knew they’d worked for other people I knew, so I wanted to give it a try. But I knew I needed a method to make it easy to stick to the program, do the intervals correctly, and keep track of my progress to keep me moving forward.

That’s where “RunDouble” was great. I used the C25K timed interval plan and, for me, it was almost as good as having a personal trainer coaching me through each run. I’d tune in the radio on my smartphone for some music, and the voice prompts would guide me through the rest – when to start running, slow to a walk, and even a 5 minute warm up and cool down. I loved the GPS tracking with colour coding of the run and walk intervals, and seeing my distance and pace increase gradually with each run made me proud and want to keep working harder.

I’ll be honest – I didn’t complete the whole training program. But I did purchase the “Pro” version and believe that without “RunDouble” I never would have competed in my first 5km race early this year. This app helped my form good habits to become a regular runner, even when I was starting out with zero fitness level.

I think the hardest thing about getting into running is taking that first step – find something to motivate you – like this app – and get your butt off the couch! I’m not going to lie and tell you it’s easy. But I will promise that if you’re anything like me, just stick with it and running could become your favourite part of every day and a healthy lifestyle change you’ll thank yourself for making.